AWSでオープンソースLMSを構築!Canvas LMS導入の手引き

Canvas LMS(Learning Management System)は、オープンソースの学習管理システムで、オンラインコースの作成・管理、学生の成績管理、課題の提出・フィードバックなどをサポートする教育プラットフォームです。世界中の大学や企業で使用されており、直感的なインターフェースと強力な機能が特徴です。
Canvas LMSには以下のような機能があります。
- コース管理
- コミュニケーションツール
- 課題と評価
公式のProduction環境構築は以下のGitHubです。
https://github.com/instructure/canvas-lms/wiki/Production-Start
AWSでCanvas LMSを構築する手順
AWSでCanvas LMSを構築する際の大まかな流れは以下の通りです:
- EC2インスタンスの設定:
- Amazon LinuxやUbuntuなどのOSを選択し、EC2インスタンスを立ち上げます。Canvas LMSはRailsで構築されているため、Rubyのインストールや必要なソフトウェアの設定が必要です。
- RDS(Relational Database Service)のセットアップ:
- MySQLやPostgreSQLなどのリレーショナルデータベースを選択して構築します。Canvas LMSのデータベースとして使用します。
- S3バケットの設定:
- S3を使用して、ファイルのアップロード先や教材の保存先として設定します。Canvasのファイルストレージとして活用できます。
- ELB(Elastic Load Balancer)およびAuto Scalingの設定:
- 必要に応じてELBを設定し、アクセスの負荷分散を行います。また、Auto Scalingを設定することで、アクセス数に応じてEC2インスタンスの数を自動で調整できます。
- アプリケーションのデプロイ:
- EC2インスタンス上でCanvas LMSのインストールスクリプトを実行し、アプリケーションをデプロイします。
- 必要な設定ファイル(
database.ymlやcanvas_settings.ymlなど)を編集し、RDSやS3との接続設定を行います。
- SSL/TLS設定とドメインの設定:
- ドメインを設定し、SSL証明書(ACM)を使って安全な通信を行えるようにします。

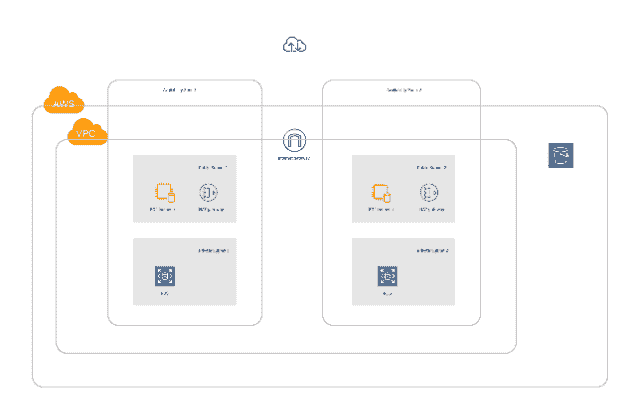
VPCの作成
AWSのメニューからVPCに移動し、
- VPC
- サブネット(public01,public02,private01,private02)
- インターネットゲートウェイ
- NATゲートウェイ
- ルートテーブル
を作成しよう。
EC2インスタンスの作成
ここで、
- 踏み台サーバー
- Webサーバー
- ELB
を作成します。
私はOSをUbuntu22.04にしました。
※ここでボリュームが20GBだと必要なツールのインストールで容量が足りなくなるので、40GB以上は欲しいです。
踏み台のセキュリティグループは、インバウンドルールをタイプSSHだけで良いかと思います。
ロードバランサーのセキュリティグループのインバウンドはタイプHTTP、HTTPS。
HTTPSできたものもロードバランサーがHTTPでWebサーバーに渡してくれます。
後述しますが、私はApachとPassengerではなくpumaを使うことにしました。
RDSを作成する
Canvas LMS推奨のPostgreSQLで構築しましょう。
サイズは「db.t4g.micro」にしました。EC2に接続するオプションもあるので一緒にやっておきます。
DBの作成ができたら、接続を確かめます。EC2にSSH接続し、
# toolがまだであれば入れておく
sudo apt update
sudo apt install postgresql-client -y

# 接続確認
psql -h <RDSエンドポイント> -p <ポート番号> -U <ユーザー名> -d <データベース名>
postgreSQLコマンド
# 接続情報確認
\conninfo

# データベース一覧表示
\l

# データベースから出る
\q
S3を作成する
手順としては、
- バケットを作成する
- IAMでロールを作成
- EC2に作成したロールを設定
となります。
バケットを作成
バケットポリシーを設定しておきましょう
{
    "Version": "2012-10-17",
    "Statement": [
        {
            "Effect": "Allow",
            "Principal": {
                "AWS": "arn:aws:iam::<YOUR_AWS_ACCOUNT_ID>:role/<YOUR_Role>"
            },
            "Action": [
                "s3:PutObject",
                "s3:GetObject"
            ],
            "Resource": "arn:aws:s3:::<YOUR_DOMAIN>*"
        }
    ]
}
Railsがファイルのアップロードなど出来るように、Cross-Origin Resource Sharing (CORS)を設定しましょう。
[
    {
        "AllowedHeaders": [
            "*"
        ],
        "AllowedMethods": [
            "GET",
            "PUT",
            "POST",
            "DELETE",
            "HEAD"
        ],
        "AllowedOrigins": [
            "https://lms.example.jp"
        ],
        "ExposeHeaders": [
            "ETag"
        ],
        "MaxAgeSeconds": 3000
    }
]
IAMでロールの作成
許可するポリシーは「AmazonS3FullAccess」となります。

ドメイン、SSLを設定
私はお名前.comでドメインを取得しました。
SSLの証明書は、「AWS Certificate Manager」で無料で取得できます。
ロードバランサーに向けるのと、証明書の認証のため、お名前側にCNEMEを登録しましょう。
Webサーバーへ接続し個人的設定
いったん、オレオレ設定ですが、zshにしたり、便利なツールを入れます。
zshに変更
# 現在のシェルを確認
echo $SHELL

# install
sudo apt update
sudo apt install zsh -y

# plugin install
sh -c "$(curl -fsSL https://raw.github.com/ohmyzsh/ohmyzsh/master/tools/install.sh)"
git clone https://github.com/zsh-users/zsh-autosuggestions ${ZSH_CUSTOM:-~/.oh-my-zsh/custom}/plugins/zsh-autosuggestions
git clone https://github.com/zsh-users/zsh-syntax-highlighting.git ${ZSH_CUSTOM:-~/.oh-my-zsh/custom}/plugins/zsh-syntax-highlightin

# デフォルトのシェルの変更
chsh -s $(which zsh)

## できないときはroot権限で
sudo su -
sudo usermod -s $(which zsh) ubuntu
.zshrcの設定
# If you come from bash you might have to change your $PATH.
# export PATH=$HOME/bin:$HOME/.local/bin:/usr/local/bin:$PATH

# Path to your Oh My Zsh installation.
export ZSH="$HOME/.oh-my-zsh"

# Set name of the theme to load --- if set to "random", it will
# load a random theme each time Oh My Zsh is loaded, in which case,
# to know which specific one was loaded, run: echo $RANDOM_THEME
# See https://github.com/ohmyzsh/ohmyzsh/wiki/Themes

ZSH_THEME="robbyrussell"

# History settings for Zsh
HISTFILE=$HOME/.zsh_history
HISTSIZE=100000
SAVEHIST=1000000

# Share history across all shell sessions and append
setopt inc_append_history
setopt share_history

plugins=(
    git
    zsh-autosuggestions
    zsh-syntax-highlighting
    history
)


source $ZSH/oh-my-zsh.sh

# Enable plugins from custom directory if installed manually
source ${ZSH_CUSTOM:-~/.oh-my-zsh/custom}/plugins/zsh-autosuggestions/zsh-autosuggestions.zsh
source ${ZSH_CUSTOM:-~/.oh-my-zsh/custom}/plugins/zsh-syntax-highlighting/zsh-syntax-highlighting.zsh

# Auto-completion settings
autoload -Uz compinit
compinit

# History search by using the arrow keys (up/down)
bindkey '^[[A' history-beginning-search-backward
bindkey '^[[B' history-beginning-search-forward

# Japanese language support
export LANG=ja_JP.UTF-8

# Customize completion menu style
zstyle ':completion:*' menu select

# Enhanced cd command for interactive navigation
setopt AUTO_CD
export NVM_DIR="$HOME/.nvm"
[ -s "$NVM_DIR/nvm.sh" ] && \. "$NVM_DIR/nvm.sh"
[ -s "$NVM_DIR/bash_completion" ] && \. "$NVM_DIR/bash_completion"
シェルにユーザー名とIPを表示(テーマを編集)
vim ~/.oh-my-zsh/themes/robbyrussell.zsh-theme


# PROMPT="%(?:%{$fg_bold[green]%}%1{➜%} :%{$fg_bold[red]%}%1{➜%} ) %{$fg[cyan]%}%c%{$reset_color%}"
# PROMPT+=' $(git_prompt_info)'

PROMPT="%{$fg_bold[green]%}%n@%m %{$fg[cyan]%}%c%{$reset_color%} $(git_prompt_info)"

ZSH_THEME_GIT_PROMPT_PREFIX="%{$fg_bold[blue]%}git:(%{$fg[red]%}"
ZSH_THEME_GIT_PROMPT_SUFFIX="%{$reset_color%} "
ZSH_THEME_GIT_PROMPT_DIRTY="%{$fg[blue]%}) %{$fg[yellow]%}%1{✗%}"
ZSH_THEME_GIT_PROMPT_CLEAN="%{$fg[blue]%})"
いっかいデフォルトのシェルを変えたのでログアウトしておいた方が良いかも。
以下はzshの変更をしたときに反映させるコマンド。
source ~/.zshrc
日本時間への変更
# 日本時間へ変更
sudo timedatectl set-timezone Asia/Tokyo

# 確認
timedatectl
CanvasLMSを構築する
WebサーバーへSSHしてください。
必要そうなパッケージなどを入れておく。
sudo apt update && sudo apt upgrade -y
sudo apt install -y git curl wget zip unzip build-essential software-properties-common imagemagick zlib1g-dev libpq-dev g++
ifconfigやnetstatなどのネットワーク関連のコマンド
sudo apt install -y net-tools htop
postgreSQLを扱うためのクライアントツールをインストール
sudo apt update
sudo apt install postgresql-client -y
接続の確認
psql -h <RDSエンドポイント> -U <ユーザー名> -d <データベース名>
Node.js & npmも入れておきましょう
nvmでバージョン管理します。
# Node.js
curl -o- https://raw.githubusercontent.com/nvm-sh/nvm/v0.39.3/install.sh | bash

# nvmを使えるようにする(.bashrcまたは.zshrcにパスを設定)でも入ってた。
export NVM_DIR="$HOME/.nvm"
[ -s "$NVM_DIR/nvm.sh" ] && \. "$NVM_DIR/nvm.sh"

# 変更を反映
source ~/.bashrc

nvm --version


# 最新のLTS(長期サポート)バージョンをインストール
nvm install --lts

# インストール済みのバージョンを確認
nvm ls

# 使用するNode.jsのバージョンを切り替え
nvm use <version>

# デフォルトで使用するバージョンを設定
nvm alias default <version>


ubuntu@ip-172-31-33-199:~$ node -v
v20.17.0

npm -v
10.8.2

npm install -g yarn
Ruby と Bundler
CanvasLMSが動作確認をしているruby3.1にします
sudo apt-get install software-properties-common
sudo add-apt-repository ppa:instructure/ruby
sudo apt-get update

sudo apt-get install ruby3.1 ruby3.1-dev zlib1g-dev libxml2-dev \
                       libsqlite3-dev postgresql libpq-dev \
                       libxmlsec1-dev libyaml-dev libidn11-dev make

# 確認
ruby -v
Canvas LMSの設置
/var/canvas におく。
sudo mkdir /var/canvas
sudo chown ubuntu:ubuntu /var/canvas
cd /var/canvas
git clone https://github.com/instructure/canvas-lms.git .
git checkout prod
cd /var/canvas
sudo gem install bundler --version 2.5.10
bundle config set --local path vendor/bundle
bundle install
NodeJSの依存関係をインストールする
yarn install
Canvasのデフォルトの設定
bashのforループで、リスト(.example)のファイルをコピーしていきます。
sysadmin@appserver:/var/canvas$ for config in amazon_s3 database vault_contents \
  delayed_jobs domain file_store outgoing_mail security external_migration; \
  do cp config/$config.yml.example config/$config.yml; done
各種設定
各種設定をproductionに設定していきましょう。
データベース設定
vim config/database.yml
送信メールの設定
vim config/outgoing_mail.yml
URL設定
vim config/domain.yml
セキュリティ設定
vim config/security.yml
S3の設定
config/file_store.yml
設定したら、Apache と自動ジョブデーモンを両方再起動します。
sudo /etc/init.d/apache2 restart && sudo /etc/init.d/canvas_init restart
下記がドキュメント
https://github.com/instructure/canvas-lms/wiki/Canvas-Integration
データベースへ初期データを入れる
yarn gulp rev
RAILS_ENV=production bundle exec rake db:initial_setup
管理者のメールやパスワード、アカウント名などを聞かれるので入力する。
アセットの生成
cd /var/canvas

mkdir -p log tmp/pids public/assets app/stylesheets/brandable_css_brands

touch app/stylesheets/_brandable_variables_defaults_autogenerated.scss

touch Gemfile.lock

touch log/production.log

RAILS_ENV=production bundle exec rake canvas:compile_assets
Apacheの設定
# Apache2をインストール
sudo apt-get install apache2

# dirmngr、gnupg、apt-transport-https、ca-certificatesパッケージをインストール
# これらは、HTTPSでのパッケージの取得や証明書の管理などに必要です
sudo apt-get install -y dirmngr gnupg apt-transport-https ca-certificates

# GPGキーを追加
# パッケージの信頼性を確認するためのキーを追加します
sudo apt-key adv --keyserver hkp://keyserver.ubuntu.com:80 --recv-keys 561F9B9CAC40B2F7

# パッケージリストの更新
sudo apt-get update
mod_rewrite を使用するので、これを有効にする
sudo a2enmod rewrite
※公式ではPassengerを使っていますが、私は慣れているpumaにしました。
pumaはデフォルトでインストール済でしたので、起動の設定をしていきます。
sudo vim /etc/systemd/system/puma.service

# 設定
[Unit]
Description=Puma HTTP Server
After=network.target

[Service]
Type=simple
User=ubuntu
WorkingDirectory=/var/canvas
EnvironmentFile=/var/canvas/.env
ExecStart=/bin/bash -lc 'bundle exec puma -C config/puma.rb'
Restart=always

[Install]
WantedBy=multi-user.target
変更を反映+確認していきます。
sudo systemctl enable puma
sudo systemctl start puma

sudo systemctl status puma

ps aux | grep puma
Apacheの設定ファイル
sudo vim /etc/apache2/sites-available/000-default.conf設定は以下
<VirtualHost *:80>
        ServerName <ドメイン>
        ServerAlias <ロードバランサーのエンドポイント>

        ServerAdmin webmaster@localhost
        DocumentRoot /var/canvas/public

        <Directory /var/canvas/public>
                AllowOverride all
                Options +Indexes +FollowSymLinks
                Require all granted
        </Directory>

        # Puma へのリバースプロキシ設定
        ProxyPreserveHost On
        ProxyPass / http://127.0.0.1:3000/
        ProxyPassReverse / http://127.0.0.1:3000/

        ErrorLog ${APACHE_LOG_DIR}/error.log
        CustomLog ${APACHE_LOG_DIR}/access.log combined
</VirtualHost>

# vim: syntax=apache ts=4 sw=4 sts=4 sr noet
※Apacheで/var/canvas/public内の静的アセットを配信するけど、どうにも読み込めないときは、ProxyPass /dist !をProxyPassの上に入れて、config/environments/production.rbのconfig.public_file_server.enabled = trueにする方法がよく出てくるが、、、
自動化されたジョブ
sudo ln -s /var/canvas/script/canvas_init /etc/init.d/canvas_init
sudo update-rc.d canvas_init defaults
sudo /etc/init.d/canvas_init start
再起動
sudo systemctl daemon-reload
sudo systemctl restart apache2
sudo systemctl restart puma
ログを確認する
tail -f /var/canvas/log/puma.log
tail -f /var/canvas/log/production.log
tail -f /var/canvas/log/production.log | awk '{ print strftime("%Y-%m-%d %H:%M:%S"), $0; fflush() }'
Railsコンソール
RAILS_ENV=production bundle exec rails console
